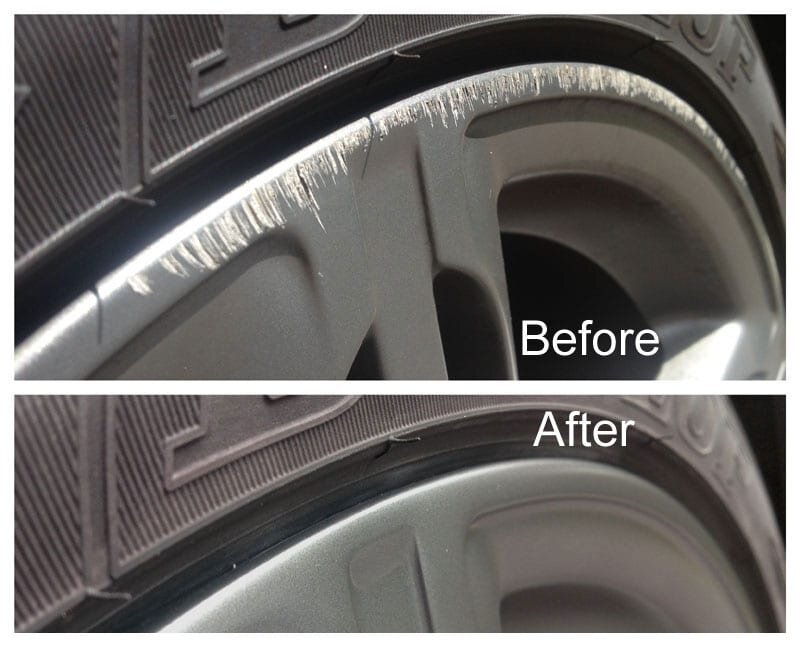
How to Fix Scratched Rims: A Step-by-Step Guide to Restoring Your Alloy Wheels
Have you ever felt frustrated seeing unsightly curb rash on your beloved car wheels? Don't worry, these scratches aren't irreversible. This guide will walk you through the process of fixing scratched alloy wheels, restoring their original shine, and introducing how alloy wheel fillers can prevent future damage.

Part 1: Assess the Damage – Is It a DIY Job?
DIY Repairable Damage
- Surface scratches and abrasions: Only affecting the clear coat and paint layers.
- Minor dents and chips.
When to Seek Professional Help
- Cracks or structural bending on the rim.
- Significant air leaks or loss of wheel roundness.
- Lack of confidence in performing the repair, or lack of time.
Part 2: Gathering Your Tools and Materials
Safety Protection
- Safety goggles
- Dust mask
- Chemical-resistant gloves
Cleaning Supplies
- Wheel cleaner
- Degreaser
- Microfiber cloths
- Painter's tape and plastic sheeting (for masking areas)
Core Repair Materials
- Sandpapers: 180 grit, 400 grit, 800 grit, 1000 grit, 1500 grit, 2000 grit
- Alloy Wheel Filler / Repair Putty: Used for filling deeper gouges and restoring the wheel's smoothness.
- Alloy wheel repair kit (usually includes primer, paint, and clear coat)

Spray Tools
- Spray primer
- Spray paint (ensure it matches your original wheel color)
- Glossy clear coat
Polishing Tools
- Polishing machine (manual or electric)
- Polishing compound
- Clean polishing cloth
Part 3: The Step-by-Step Repair Process
Step 1: Safety First – Remove and Clean the Wheel
- Park your vehicle on a flat, well-ventilated surface and engage the parking brake.
- Best Practice: Remove the wheel and place it on a clean, dry surface to ensure no brake contamination during the repair process.
Step 2: Masking – Protect the Tire
- Use painter's tape and plastic sheeting to cover the tire, leaving only the scratched area exposed. This will prevent any paint overspray from affecting the tire.
Step 3: Sanding – Smoothing the Scratches
- Coarse Sanding: Use 180-400 grit sandpaper to smooth out the scratched area. Remove any burrs and raised spots until the surface is smooth.
- Tip for Wet Sanding: Keep the surface wet while sanding. This helps reduce the risk of sanding too much and helps achieve a smoother finish. Wet sanding will also minimize dust and give a finer texture.
Step 4: Filling – Using Alloy Wheel Filler for Deep Gouges
- Alloy Wheel Filler / Repair Putty: Apply the filler to any deep gouges or chips. This material helps level the surface and fill in gaps caused by deeper scratches.
- Follow the manufacturer's instructions for application and curing times.
Step 5: Final Sanding – Creating a Perfectly Smooth Surface
- Once the filler has dried, use progressively finer sandpaper (800 grit to 2000 grit) to smooth out the area. This ensures the repair blends seamlessly with the rest of the wheel surface.
- Tip for Smooth Sanding: Sand in a circular motion to ensure the surface remains even and smooth. Use water to dampen the sandpaper for a finer, smoother finish.
Step 6: Final Cleaning and Re-masking
- Wash off all sanding dust with clean water, and use a degreaser to ensure the surface is immaculate. Any remaining dust can interfere with the paint application.
- Reapply painter's tape and plastic sheeting to prepare for the next steps.
Step 7: Painting – Primer, Color, and Clear Coat
- Spray Primer: Apply 2-3 thin coats of primer. Allow each coat to dry thoroughly before applying the next.
- Spray Color Paint: Apply 2-3 thin layers of paint to match the original wheel color. Allow each layer to dry before proceeding.
- Clear Coat: Finish with 2-3 layers of glossy clear coat to protect the paint and add shine.
- Spraying Tips: Spray from about 6-8 inches away from the surface to ensure even coverage without drips. Hold the spray can in a consistent motion across the wheel to avoid uneven paint coverage.
Step 8: The Waiting Game – Drying and Curing
- Allow the painted wheel to sit in a dust-free, ventilated area for at least 24 hours to cure fully.
- Patience is key here – rushing the drying process can lead to uneven results and reduced durability.
Step 9: Polishing – Blending for a Factory Finish
- After the paint has dried completely, use a polishing machine and compound to blend the repaired area with the rest of the wheel. This step will bring back the factory shine and make the repair less noticeable.
Part 4: How to Prevent Future Scratches
Good Driving Habits
- Keep a safe distance from curbs when parking to avoid scraping your wheels.
- Avoid driving over curbs at an angle to minimize the risk of damage.
Physical Protection
- Alloy Wheel Protectors / Rim Guards: These are rubber or plastic protectors that fit around the edges of your rims. They act as a shield, absorbing impacts and protecting the wheels from future scratches or dents.
Ceramic Coating
- Apply a ceramic coating to your wheels. This creates a hydrophobic surface that repels dirt and brake dust and provides extra protection against minor abrasions.
Regular Maintenance:
Apply a professional coating, such as crystal or ceramic, to your wheels. This will make the surface smoother and more resistant to minor scratches.
Conclusion
Fixing scratched rims is a rewarding DIY task that can save you money and help you keep your wheels looking pristine. By following the step-by-step guide, you can restore your alloy wheels and enjoy their shine again.
Additionally, installing an alloy wheel protector can help prevent future damage, keeping your car looking its best.