



Tesla Paint Repair: DIY or Professional Repair? Cost, Options, and When to Get Help
A small chip or scratch can be frustrating, especially on a newer Tesla. The good news is that not every paint problem needs a body shop. For small areas of missing paint, a touch-up product may be enough to improve the appearance and protect the damaged area.
The harder question is knowing when DIY Tesla paint repair is enough and when the damage needs professional work. The size, depth, and type of damage all matter.
What Does Tesla Paint Repair Cover?
Tesla paint repair usually refers to fixing minor damage to the painted exterior of the vehicle. Common examples include small rock chips, light scratches, and small areas where paint has been removed.
A useful way to think about the damage is:
|
Paint Damage |
DIY Repair May Work? |
Professional Repair May Be Better? |
|
Small rock chip |
Yes |
Usually not needed |
|
Small paint chip |
Yes |
Sometimes |
|
Light surface scratch |
Sometimes |
If the finish is badly affected |
|
Deep scratch |
Limited |
Yes |
|
Large area of missing paint |
Usually no |
Yes |
|
Dent with paint damage |
No |
Yes |
|
Exposed deeper body material |
Usually no |
Yes |
The goal of DIY repair is usually to make minor damage less noticeable. It should not be expected to produce the same finish as a professional repaint.
When Should You Use a Tesla Paint Repair Kit?
A Tesla paint repair kit can be useful for small, localized paint damage, such as rock chips and minor scratches. Tesla's official Paint Repair Kit is one option, currently priced at $75, while other DIY touch-up kits offer different application methods and price points.
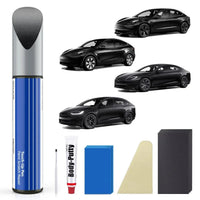
For example, a color-matched paint pen kit can be a practical choice for small chips and scratches that need precise application. The paint repair pen kit includes touch-up paint, a brush, cleaning towel, gloves, and sandpaper, with options for several Tesla paint colors. An electric sprayer kit is another option for drivers who want more even paint coverage over a larger repair area.
The best option depends on the size and type of damage. A paint pen is easier to control for a small chip, while a sprayer may make more sense when you need to cover a larger area. For comparison, Tesla's official kit uses paint and blending solution as a two-stage repair process.
Before starting, make sure the paint color matches your Tesla. Check the vehicle's paint code before ordering any touch-up product, rather than choosing a color based only on its name or appearance.
The key is to choose a repair method that fits the damage. For small, localized paint problems, a DIY touch-up kit can be a convenient option. Larger or deeper damage may require professional paint or body repair instead.

Can You Use Touch-Up Paint for Tesla Scratch Repair?
Sometimes, but it depends on how deep the scratch is.
A light scratch that only affects the upper surface may not need touch-up paint at all. After cleaning the area, you may find that some of the mark is surface contamination or transfer rather than missing paint.
If the scratch has removed some of the colored paint, a matching touch-up product can help make it less visible. However, a deep scratch that cuts through multiple layers of the finish is a different type of repair.
So, Tesla scratch repair does not always mean using touch-up paint. First determine what part of the paint system has actually been damaged.
When Is Tesla Paint Repair Not Enough?
This is the most important decision to make before starting a DIY repair.
A paint repair kit is not designed to fix a large dent, reshape a body panel, or restore a badly damaged painted surface. If the damage involves a significant dent, a large area of missing paint, or deeper layers of the body, a professional repair is usually the better choice.
For example, a long scrape caused by hitting a pole may look like a simple scratch at first. But if the panel is dented or the paint has been removed over a large area, filling the mark with touch-up paint will not restore the panel.
Recent Tesla owner discussions show the same pattern: small chips are often considered reasonable DIY projects, while deeper scratches, dents, and larger damaged areas are much more likely to need body-shop work.
A simple rule is:
If the problem is mainly missing paint, DIY repair may be reasonable. If the body panel itself is damaged, professional repair is usually the safer choice.
Tesla Paint Repair: DIY or Professional Repair?
The right choice depends less on the age of your Tesla and more on the condition of the damaged area.
|
Damage |
DIY Paint Repair |
Professional Repair |
|
Small paint chip |
Usually suitable |
Usually not necessary |
|
Light surface scratch |
May be suitable |
Optional |
|
Deep scratch |
Limited |
Recommended |
|
Exposed metal |
Usually not enough |
Recommended |
|
Large damaged area |
Not ideal |
Recommended |
|
Dent with paint damage |
Not enough |
Recommended |
DIY repair can be a practical way to deal with minor damage, but expectations matter. Even a good touch-up may still be visible under close inspection or certain lighting. One owner reported good results on multiple rock chips with the Tesla kit, while noting that larger scrapes and more serious damage took more work.
How to Do Tesla Paint Repair at Home
For a small paint chip or minor area of missing paint, take your time and work in thin layers.
Clean the Damaged Area
Wash the area first and remove dirt, dust, grease, and other surface contamination. Let the surface dry completely before applying paint.
A clean surface gives the touch-up paint a better chance of bonding properly and prevents dirt from becoming trapped in the repair.
Match the Tesla Paint Color
Use the correct paint code for your vehicle. Do not choose a color only because it looks similar in a bottle or on a screen.
Tesla's Paint Repair Kit requires you to match the four-letter paint code with the vehicle's paint code.
Apply a Small Amount of Paint
Apply the paint carefully to the damaged area rather than covering a large section of the surrounding panel.
For a deeper chip, several thin applications may work better than trying to fill the entire area at once. Allow each layer to dry as directed before continuing.
Blend the Repair
If you are using the Tesla Paint Repair Kit, the blending solution is part of the repair process. It is used after applying the paint to remove excess material and help smooth the repaired area.
Work carefully here. Too much pressure or repeated rubbing can remove paint that you have just applied.
Check the Result
Look at the repair after it has dried. Check it from different angles and in different lighting.
The goal of a small DIY repair is usually to make the damage much less noticeable, not necessarily to make the repair completely invisible.
How Much Does Tesla Paint Repair Cost?
The cost depends heavily on the damage.
For a small chip, DIY touch-up paint can be much less expensive than professional body work. Options range from about 19.99–29.99 for a color-matched paint pen kit to 39.99–45.99 for an electric sprayer repair kit, while Tesla's official Paint Repair Kit is currently listed at $75.
Professional repair can cost much more when sanding, filling, repainting, blending, or body-panel work is required. A larger repair should therefore be evaluated based on the actual damage rather than the size of the visible scratch alone.
Read More: Tesla Scratch Repair Cost: How Much Does It Cost to Fix a Scratch?
How to Know if Your Tesla Needs a Body Shop
If you are unsure whether your Tesla needs professional paint repair, look beyond the color change.
Ask yourself:
-
Is there a dent?
-
Is a large area of paint missing?
-
Does the damage look deep?
-
Is the panel itself damaged?
-
Do you need a near-perfect finish?
-
Would fixing the area require sanding, filling, or repainting?
If the answer is yes to several of these questions, a paint repair kit is probably not the right tool.
For a small chip, however, DIY touch-up paint can be a reasonable first step. It can protect the damaged spot and improve its appearance without turning a minor paint problem into a larger repair project.
How to Avoid Common Tesla Paint Repair Mistakes
The biggest mistake is treating every scratch the same way.
Do not rush into applying paint before cleaning and checking the damage. Do not use the wrong color, apply a thick layer all at once, or keep rubbing the area before the paint has had time to set.
Most importantly, know the limits of touch-up paint. A small chip is very different from a deep scratch with a dent or a large area of damaged paint.
For minor damage, a careful DIY repair can be a practical solution. For more serious or larger damage, professional paint and body repair is more likely to give you the result you want.
Read More: Tesla Wheel Repair: What You Need to Know About Damage, Repair & Cost


